


Last Days of Summer: Corn on the Cob

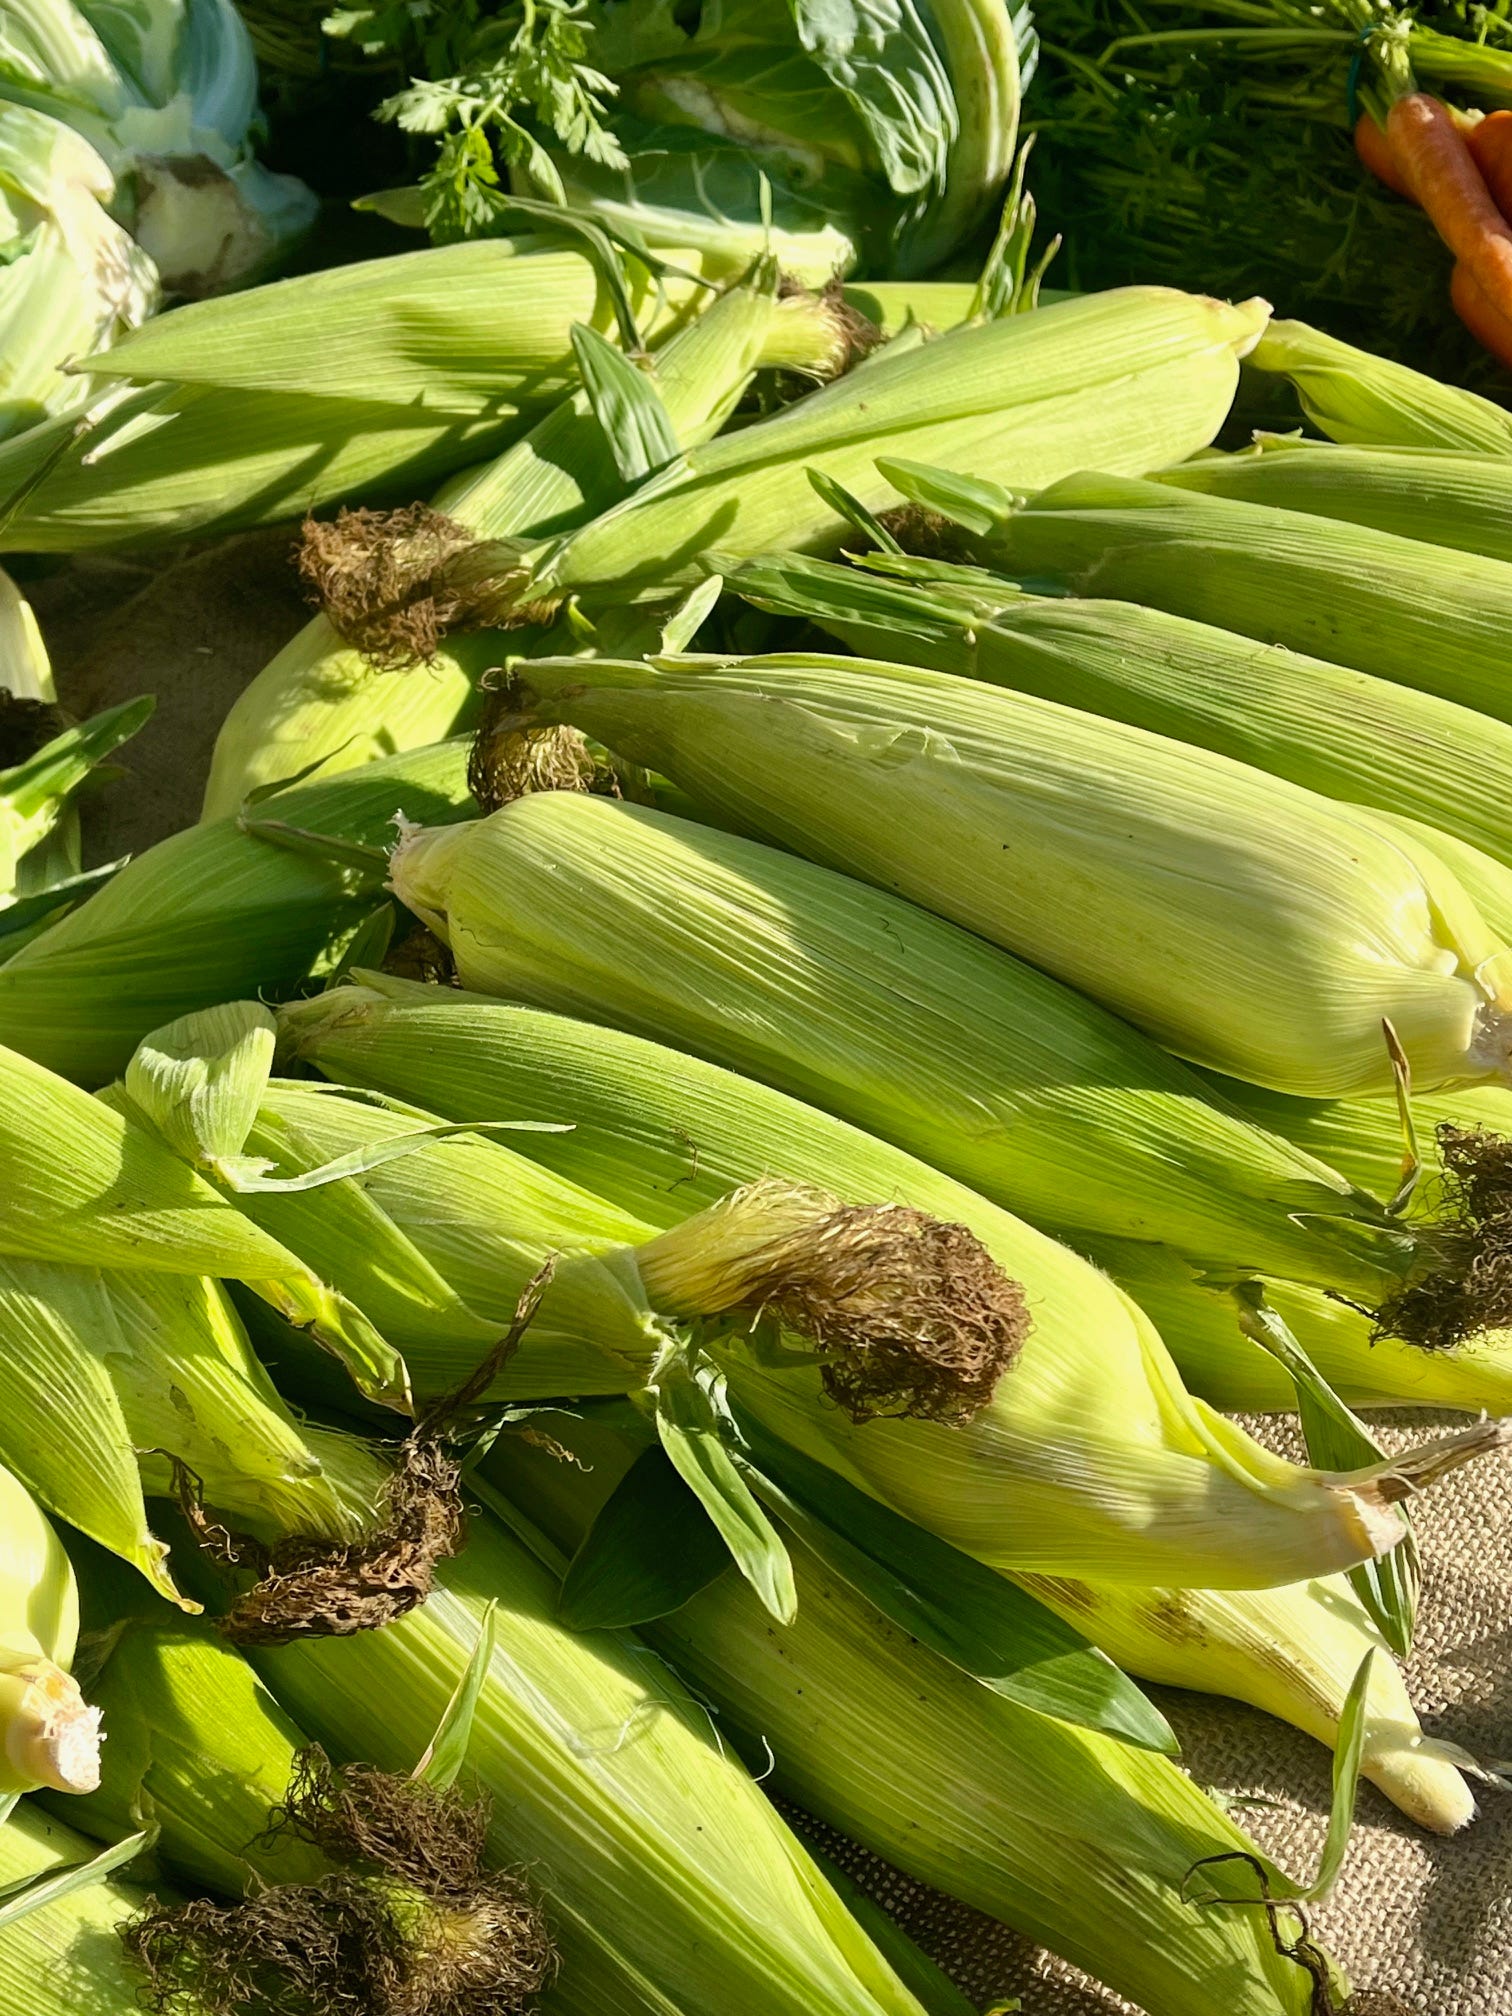
I am back from a regular Saturday morning walk, involving the farmers market and some local food shops and a walk through two parks (Ealing is blessed with a lot of green spaces). These Saturday mornings are the best. They are chatty and relaxed and as it is usually just me and Shariq, there are no teenagers moaning at me for doing a happy jig as I pick up conkers (“so cringe”) or for spending 10 minutes following nuthatches around the chestnut trees in Walpole Park. Today, everyone - local grocers, greengrocers and stall holders (and actually, the supermarkets too), had very fine looking corn on the cobs. I have been buying and cooking them for about a month now - the season is in full swing for anyone northerly.
I have probably mentioned that one of my most used stand by ingredients is frozen sweetcorn. My teens prefer it to peas and it is usually much, much nicer than the tinned stuff (too sweet and I loathe the one with pepper. Love sweetcorn and pepper but not in a can together. Ugh.) Corn is one of those things - like peas - which is great frozen, flavourwise and nutritionally, but which I only to want fresh when in season. The imported ones are not great - and if you like making on trend corn ribs they are HOPELESS as they are rock solid. I had to develop a recipe for ribs earlier this year and couldn’t cut through them. I thought it was me having a weak moment, but Shariq struggled too, and so did the stylists on the photoshoot. I swear you needed a chain saw. But British grown in season is much more doable. A final note on the frozen ones - kids love them as a snack, still hard, straight from the freezer. And a handy trick to help keep salads cold is to add them frozen before putting in a thermos or Tupperware. I did this for the teens’ lunch just this week.
There can be an obsession with getting the freshest, and therefore sweetest corn available. I remember shows when TV chefs would have a pot of water boiling fiercely before picking corn from the garden, sprinting back to the kitchen, stripping off the husks as they ran and throwing them in the water before too many of the sugars turned to starch. This verges on fetishisation for me and to be perfectly honest, having eaten fresh from the garden cobs as well as those from markets and shops, I can’t really say there is much difference. However, I am still careful about what I buy.
Look for tightly furled, green husks, corn silk (the fronds which insulate the kernels and poke out in a swirl from the top of the cobs) should range from a pale, creamy green (mermaid hair) to a richer wheat field gold - they quickly go dark brown/black at the tips, it is the inner ones you should be concerned with. Heaviness indicates a higher moisture level, therefore freshness. And kernels should be plump looking and a buttermilk yellow, what you don’t want is shrunken, wizened kernels.

How to Cook
To prep, either remove the husks and silks entirely, OR if you are serving them whole, you can leave the husks attached and just peel them back and knot together at the base of the cob - this provides you with an alternative to corn skewers/forks as the husks will cool almost immediately for handling, as opposed to the cobs which take much longer. You can also steam the cobs still wrapped in the husks - I sometimes do this with a big batch before they get finished off on the bbq.
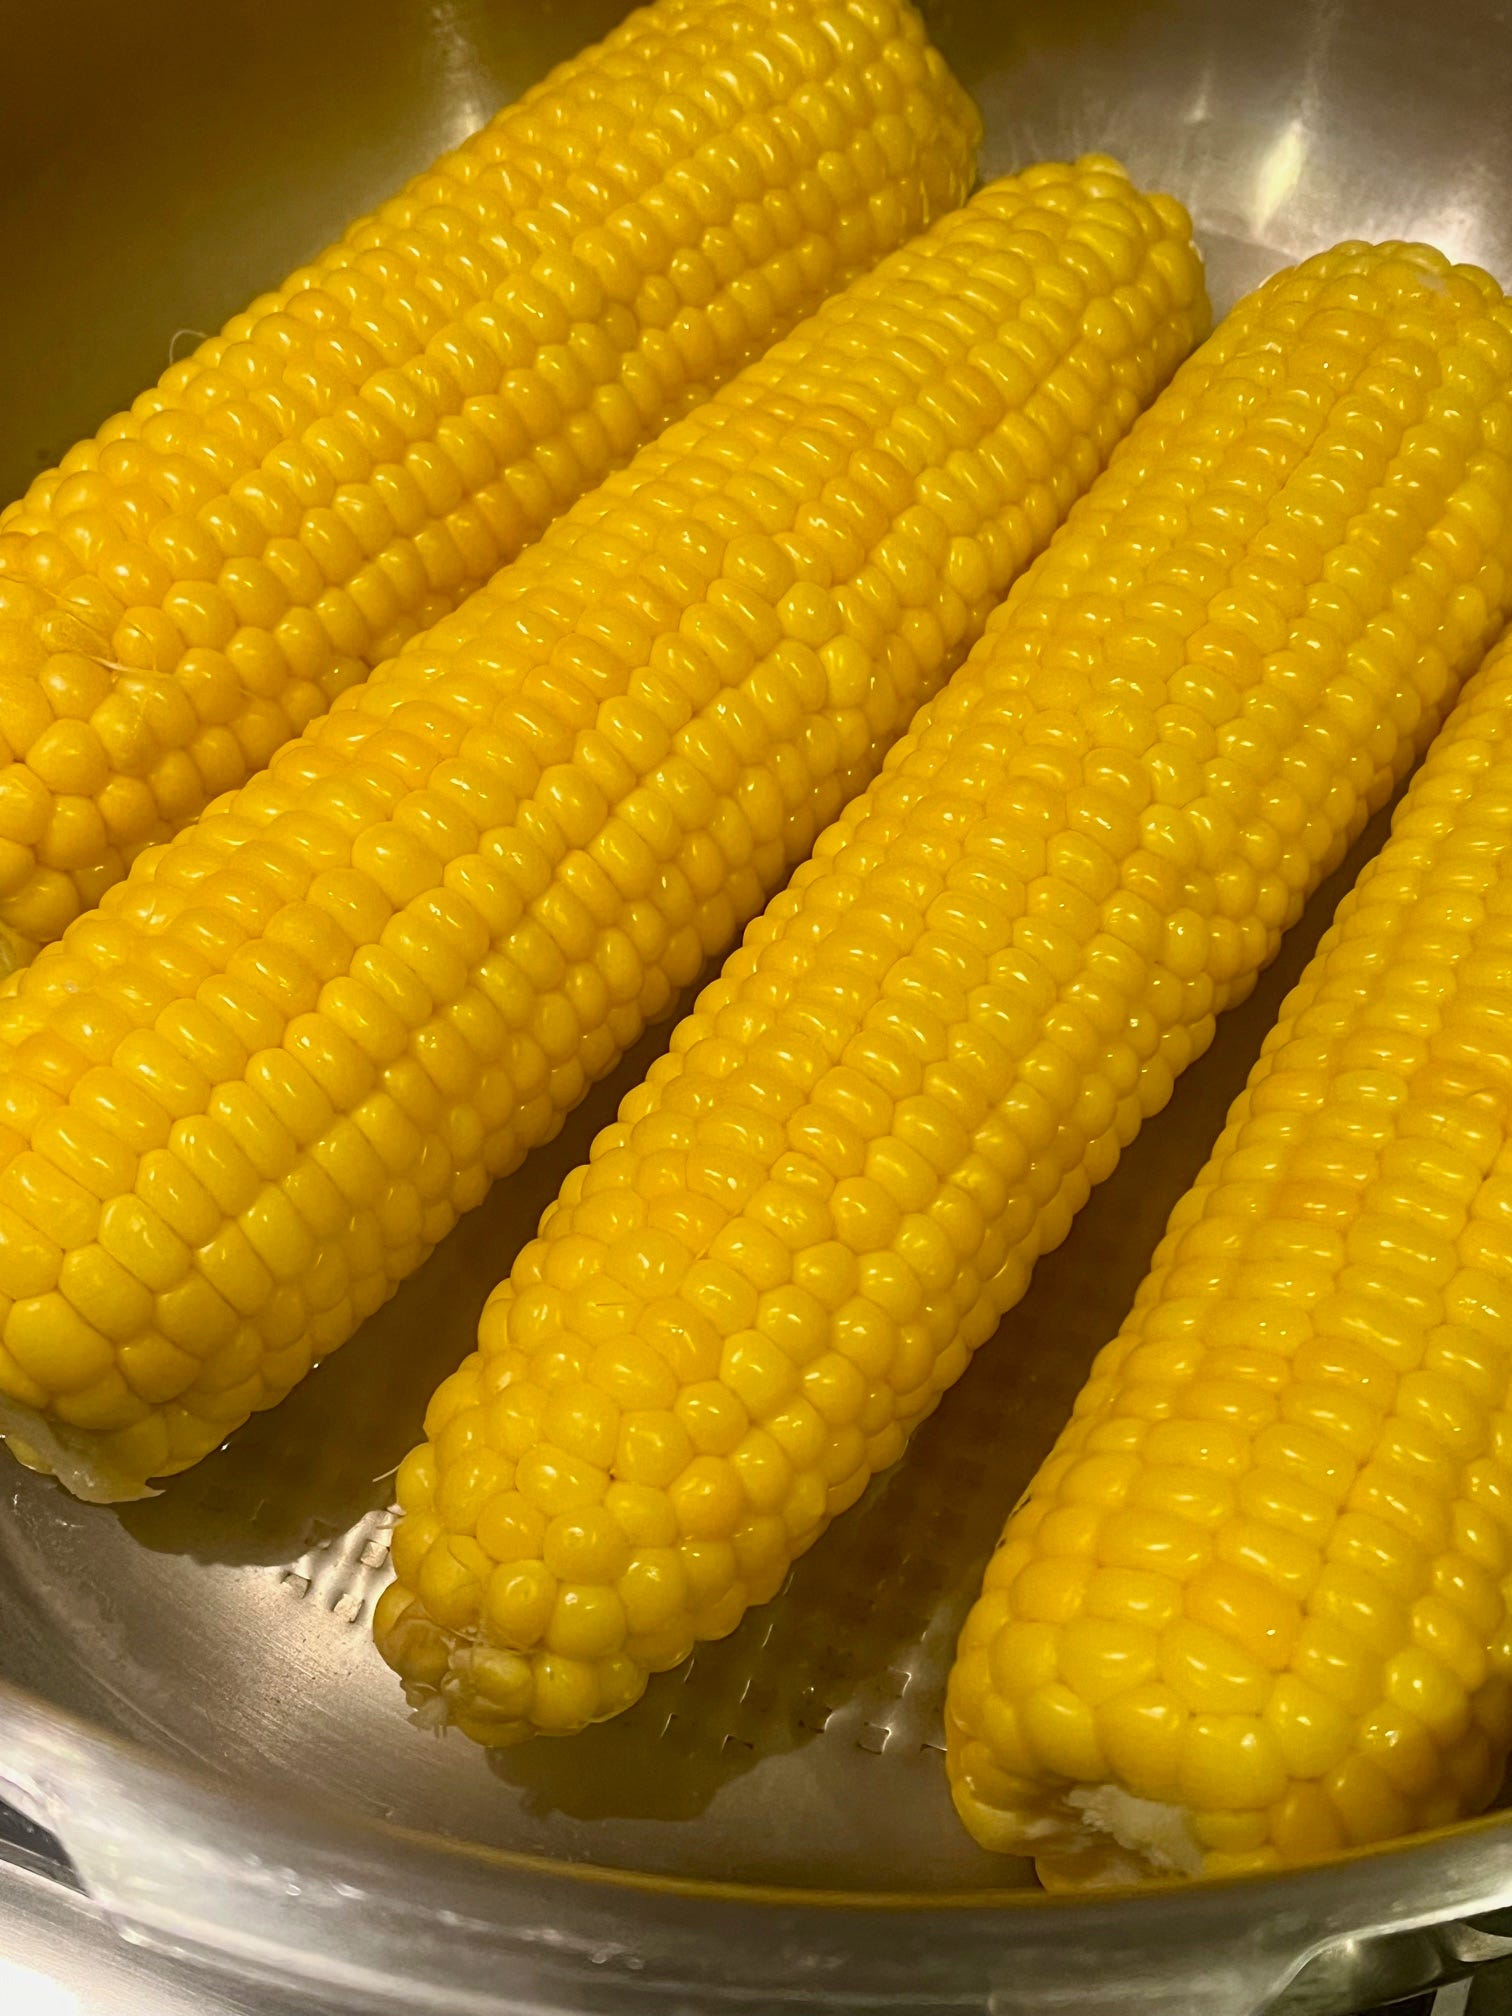
Pressure cooking, as I hope you now take as a given, will preserve the flavour and nutritional value and will also help improve (slightly), the flavour of below par cobs. The cooking is minimal. Put 1/2cm water in the base of the pressure cooker, add the cobs (naked or intact), season with salt. Bring up to high pressure and cook for zero minutes, 1 min off the heat, fast release for al dente. That’s it, done. For a more tender kernel, cook up to 3 minutes HP or 1 minutes HP natural release.
You can also sear first. Add oil to a heated pressure cooker, brown/char the cobs a bit and then proceed as above. You will get a slightly smokier flavour if you do this with the husks on - I usually strip them first. These are especially good for salads and salsas.
Best ways to eat whole Corn on the Cob:
The first meal of the season is a simple affair. Butter and salt, that’s it.
Then we might move onto flavoured butters. Anything goes. I like butter mashed with garlic, chilli and tarragon. My lot like garlic and coriander best, sprinkled with Tajin mixed with extra chilli.
Have I mentioned how peanut butter obsessed my family are? Any excuse. So peanut butter, mixed with garlic, chilli, coriander, a touch of soy sauce and lime juice/zest is another favourite.
And finally, corn on the cob with cheese. Dry cheese will obviously not stick, so mayonnaise is your friend here. Coat the cob lightly and roll in the cheese. I like a dusting of parmesan and a truffle salt. Sometimes a soft cheese with herbs stirred through.
Corn on the Cob Kernels
TIP. This is something I discovered recently. Cutting kernels off an uncooked cob can result in them flying off all over the place. BUT if you lightly cook the cobs before cutting off the kernels they won’t do this and will often stay clumped together. This is very pleasing in a salad or stirred through a braise of some sort.
Compare:
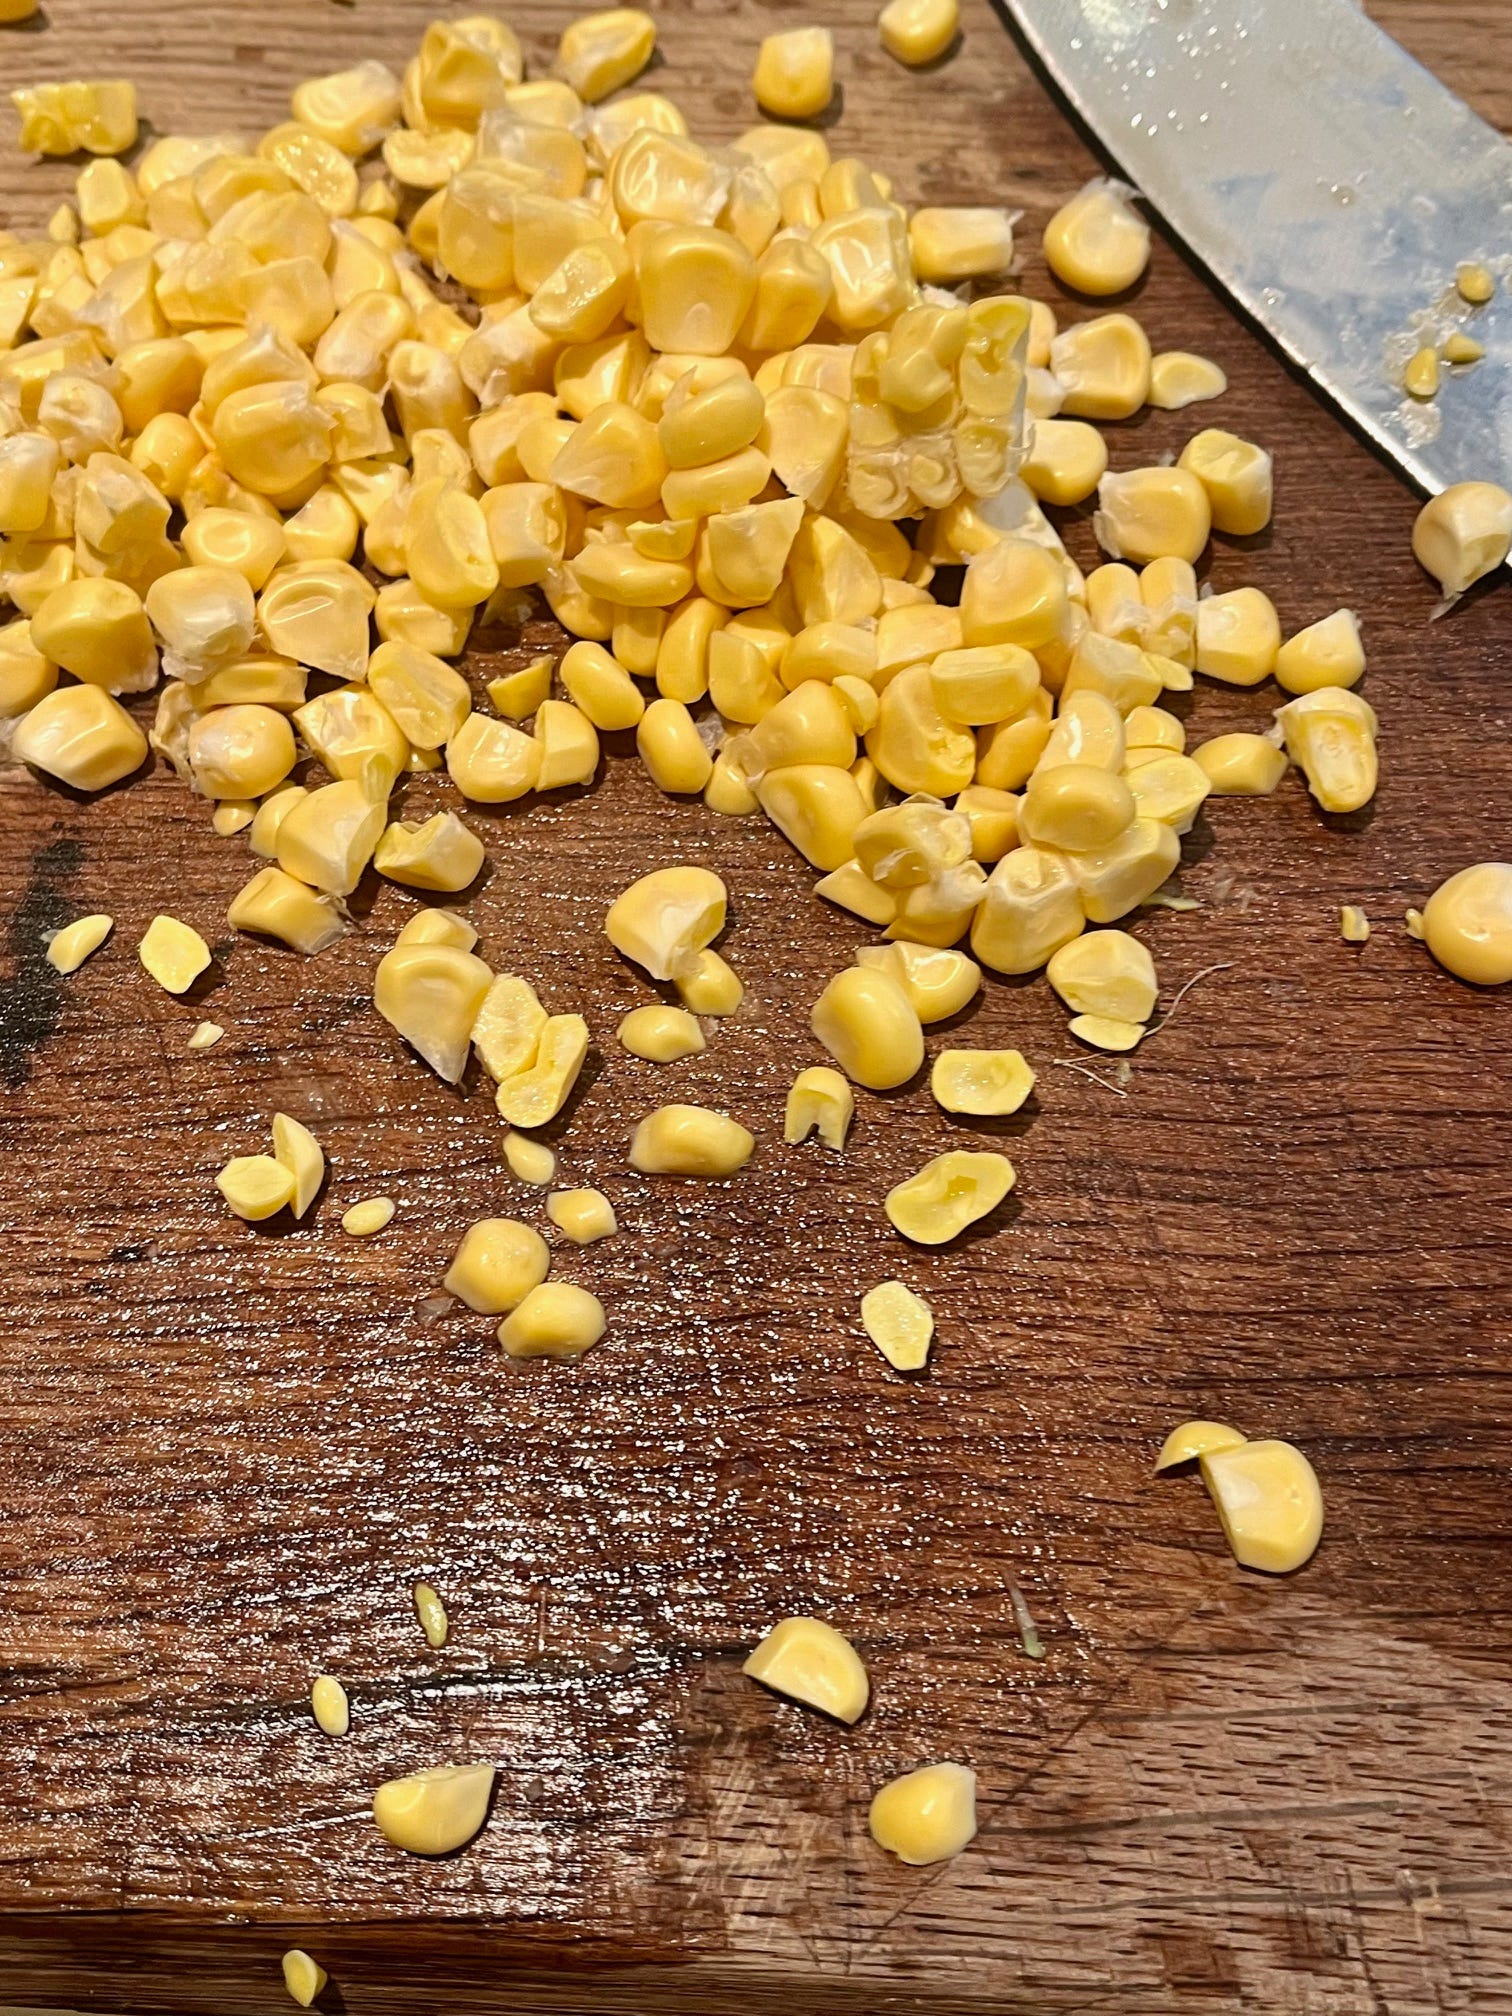
(Not shown, the kernels that ended up on the floor).
To this:
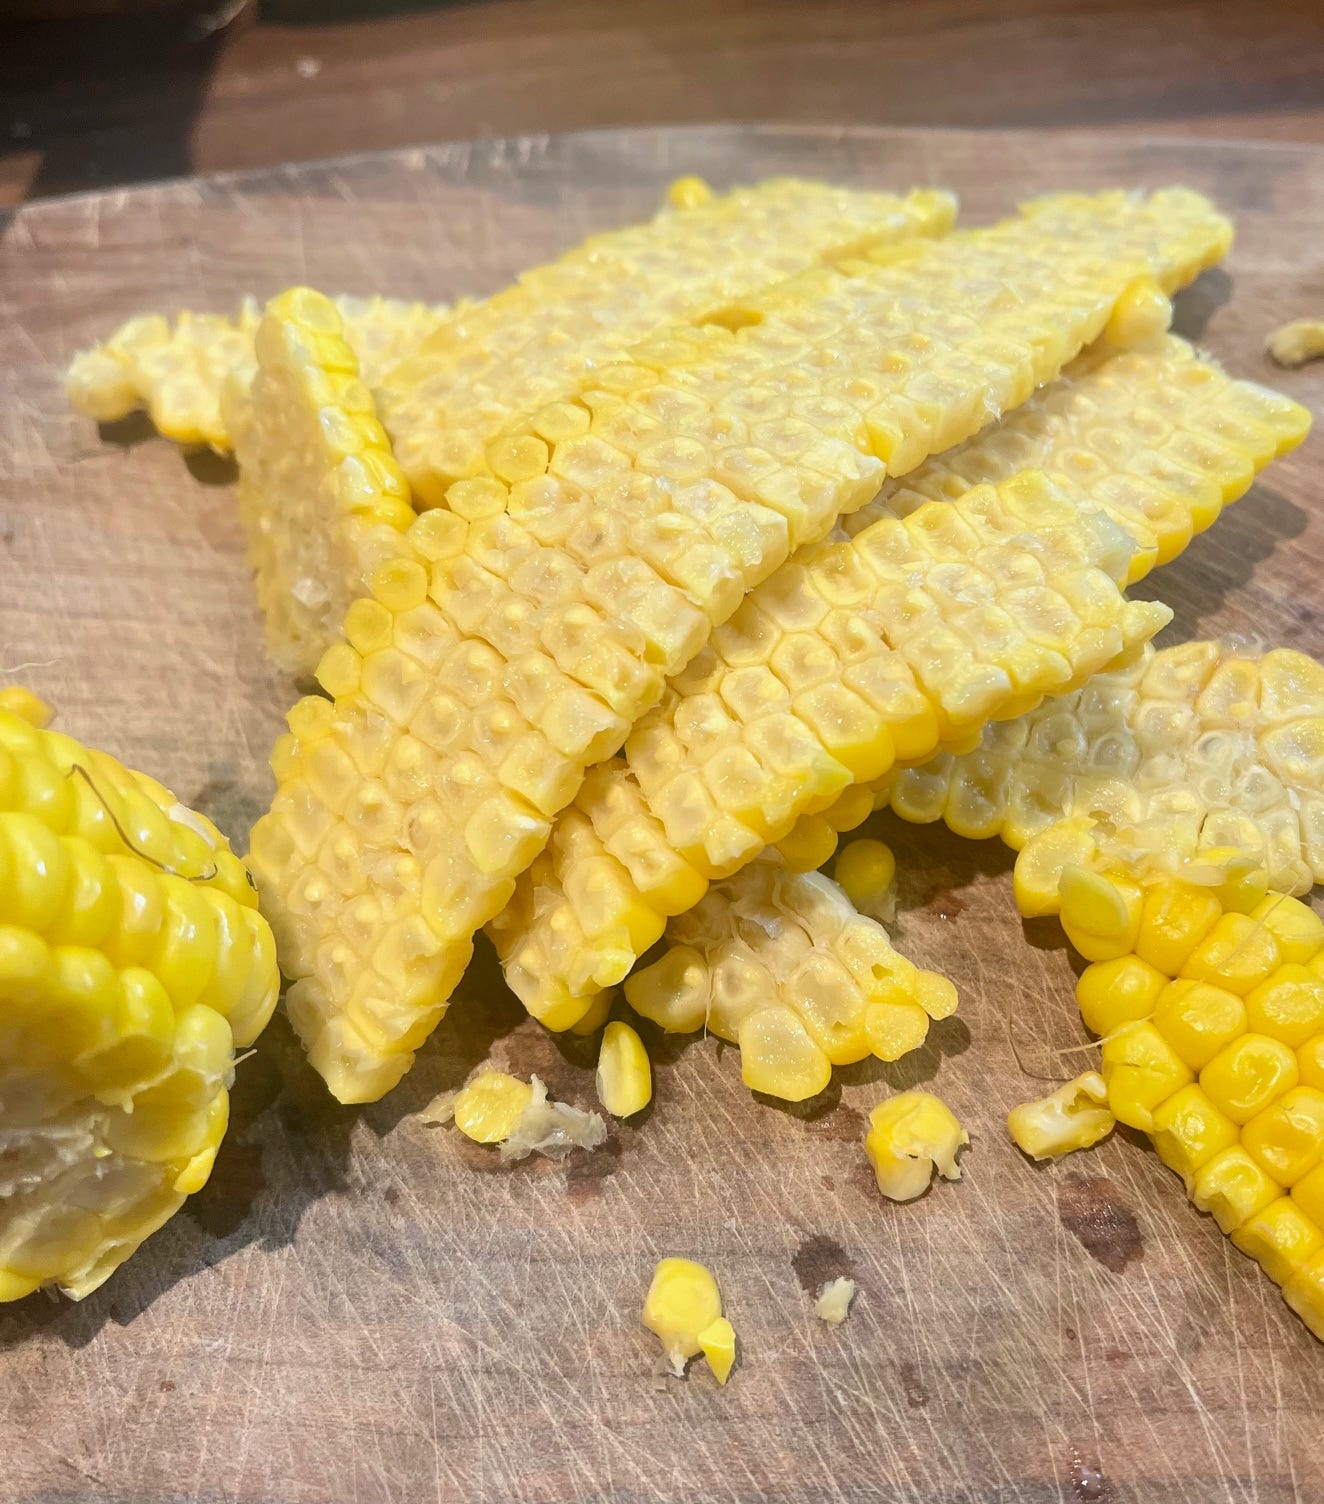
Where they for the most part slice off in satisfying strips.
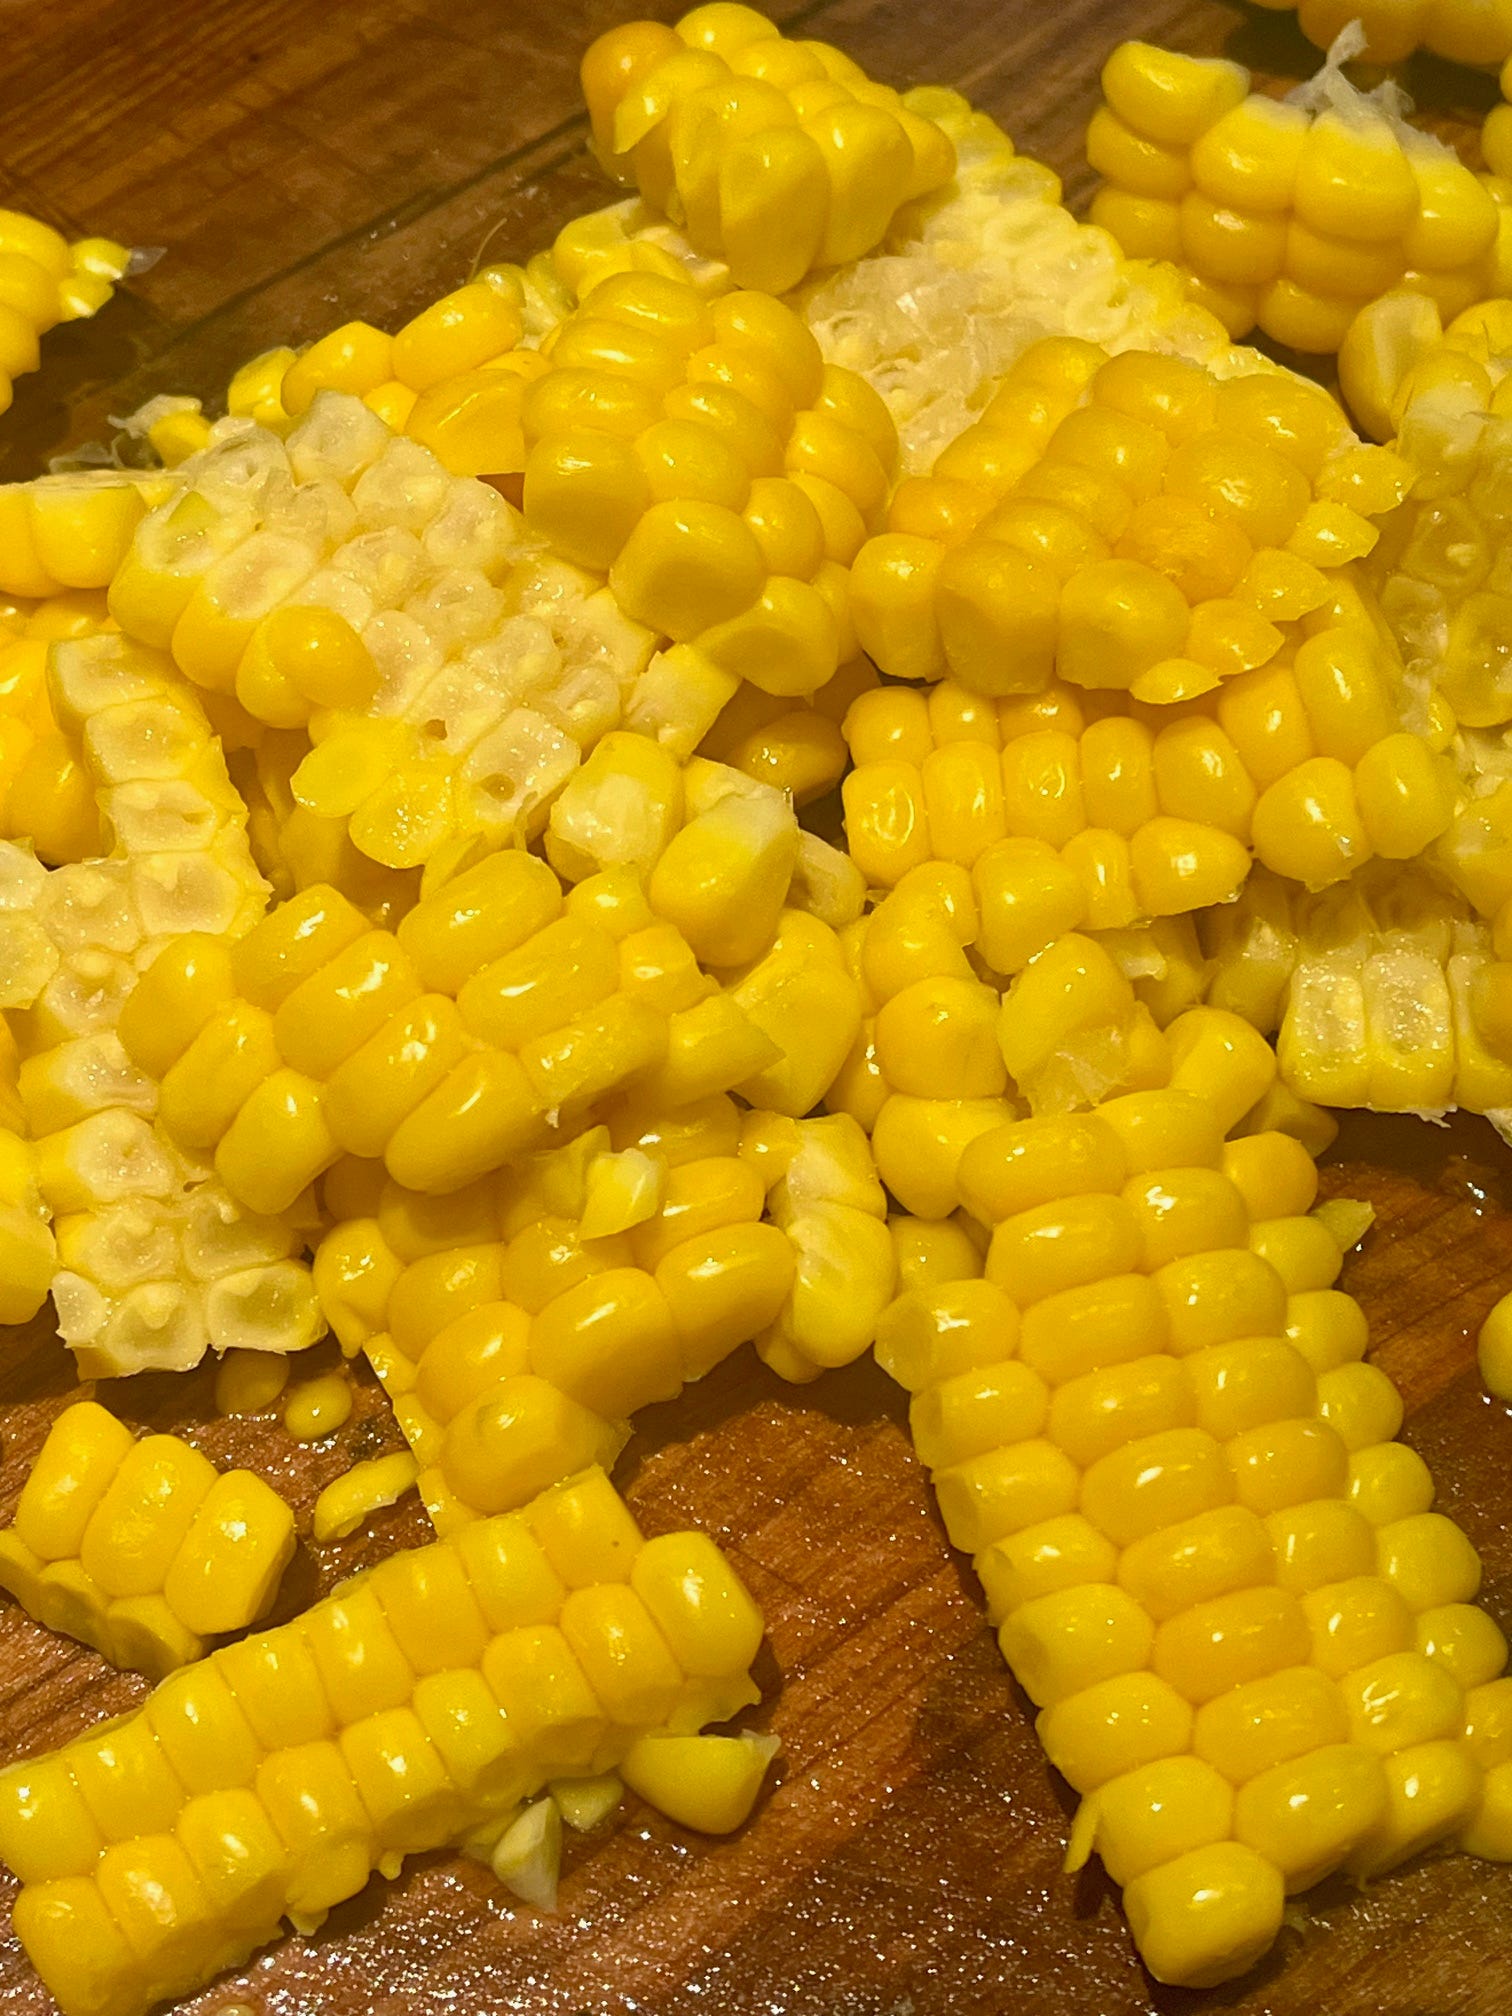
This may be something you all knew, but I didn’t and it made me very happy.
You can save the husks for wrapping all kinds of things (especially tamales of course) and they’re also good for lining your pressure cooker when steaming dumplings in place of bake-o-glide or baking parchment. But honestly, most of mine go into the compost. I know some people like corn silk tea and you can add both husk and corn to stock if you like. But I prefer the flavour using just the cobs.
Alongside Cooking
This is a useful/time and money saving thing to do - here are a couple of examples:
I made a quinoa and corn salad below and I cooked the quinoa and the corn together for 1 minute at high pressure with natural release. The quinoa is cooked in the base of the cooker, the corn is suspended above on a trivet/steamer basket.
I made a chicken and corn salad, using the zero minute method of poaching the chicken with the corn above. As cold water or stock is used to poach the chicken, it takes longer to come up to pressure, so the corn is still properly cooked.
If you want to cook corn alongside anything longer, you can leave the corn in their husks before putting in their steamer basket, or you can wrap in foil (a good opportunity to add seasoning, flavour, maybe some butter). Even so, I wouldn’t go beyond 3-5 minutes with this.
You can also sear the corn first before you steam it. This is exactly what I did with the corn for the salad below.
Corn on the Cob Stock
When you have cut the kernels off the cobs, you can use the cobs to make stock. I did this and used it in the chowder and risotto recipes below. You have various options:
Corn stock from scratch.
As simple as covering cobs with water, bringing up to high pressure, cooking for 5 mins at high pressure and leaving to drop naturally. You can also add the normal vegetable trimmings to this, any herbs you like, garlic - and to really ramp up the savoury quality a cheese rind is good too, especially if you are using it in risotto.
Add to an existing stock.
This is what I tend to do most of all, especially as I have my post farmers’ market chicken stock making ritual going on. Use chicken stock or vegetable stock and add the cobs. Just bring up to high pressure, cook for 5 minutes then natural release again.
Recipes
The following recipes are summery and hearty at the same time. They felt light enough to eat on a fairly hot day.
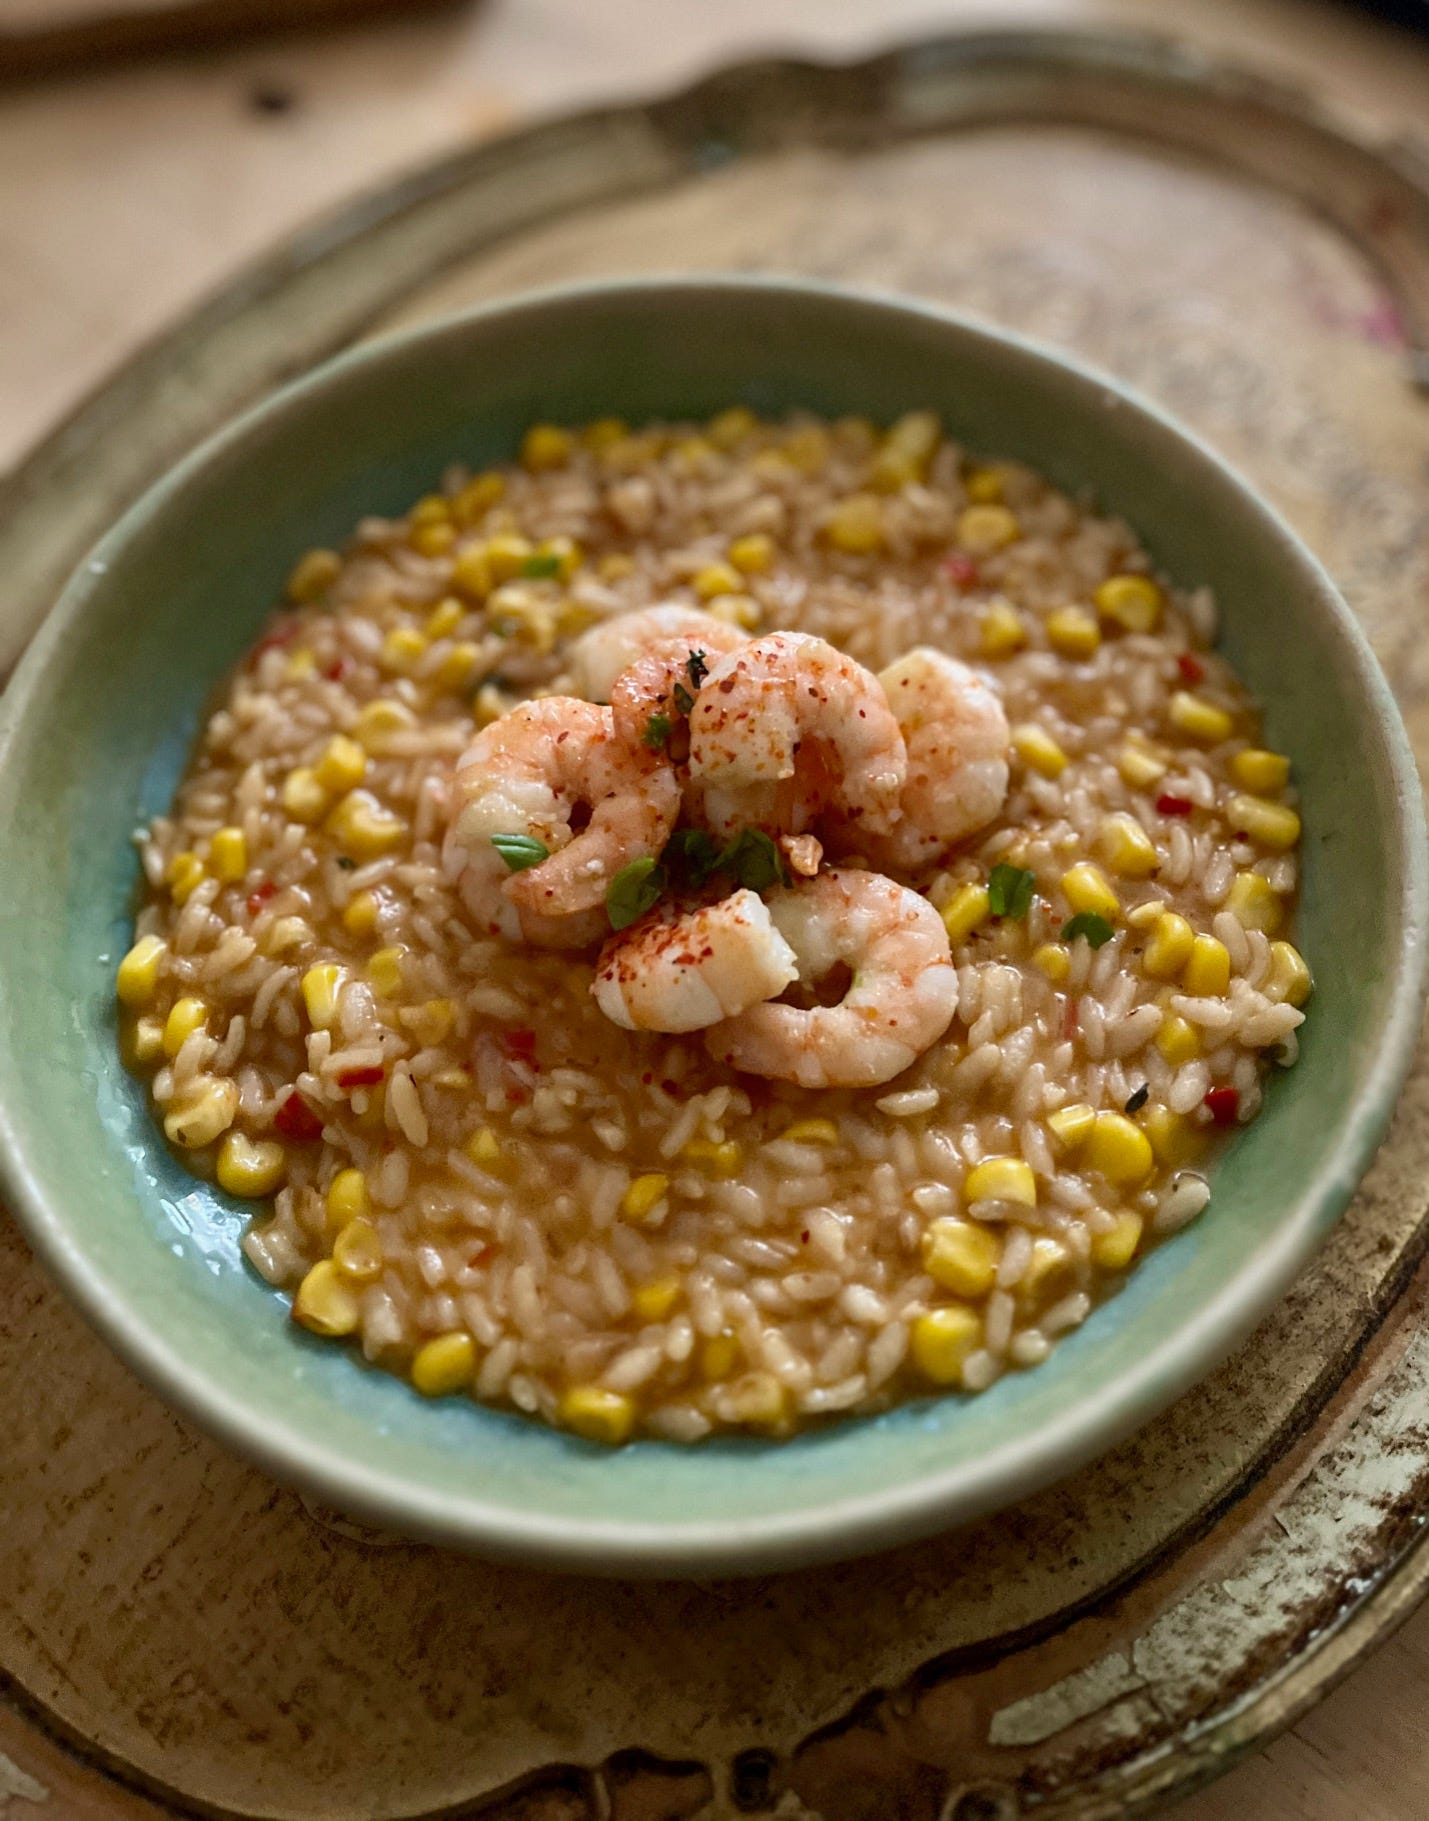
Sweetcorn Risotto
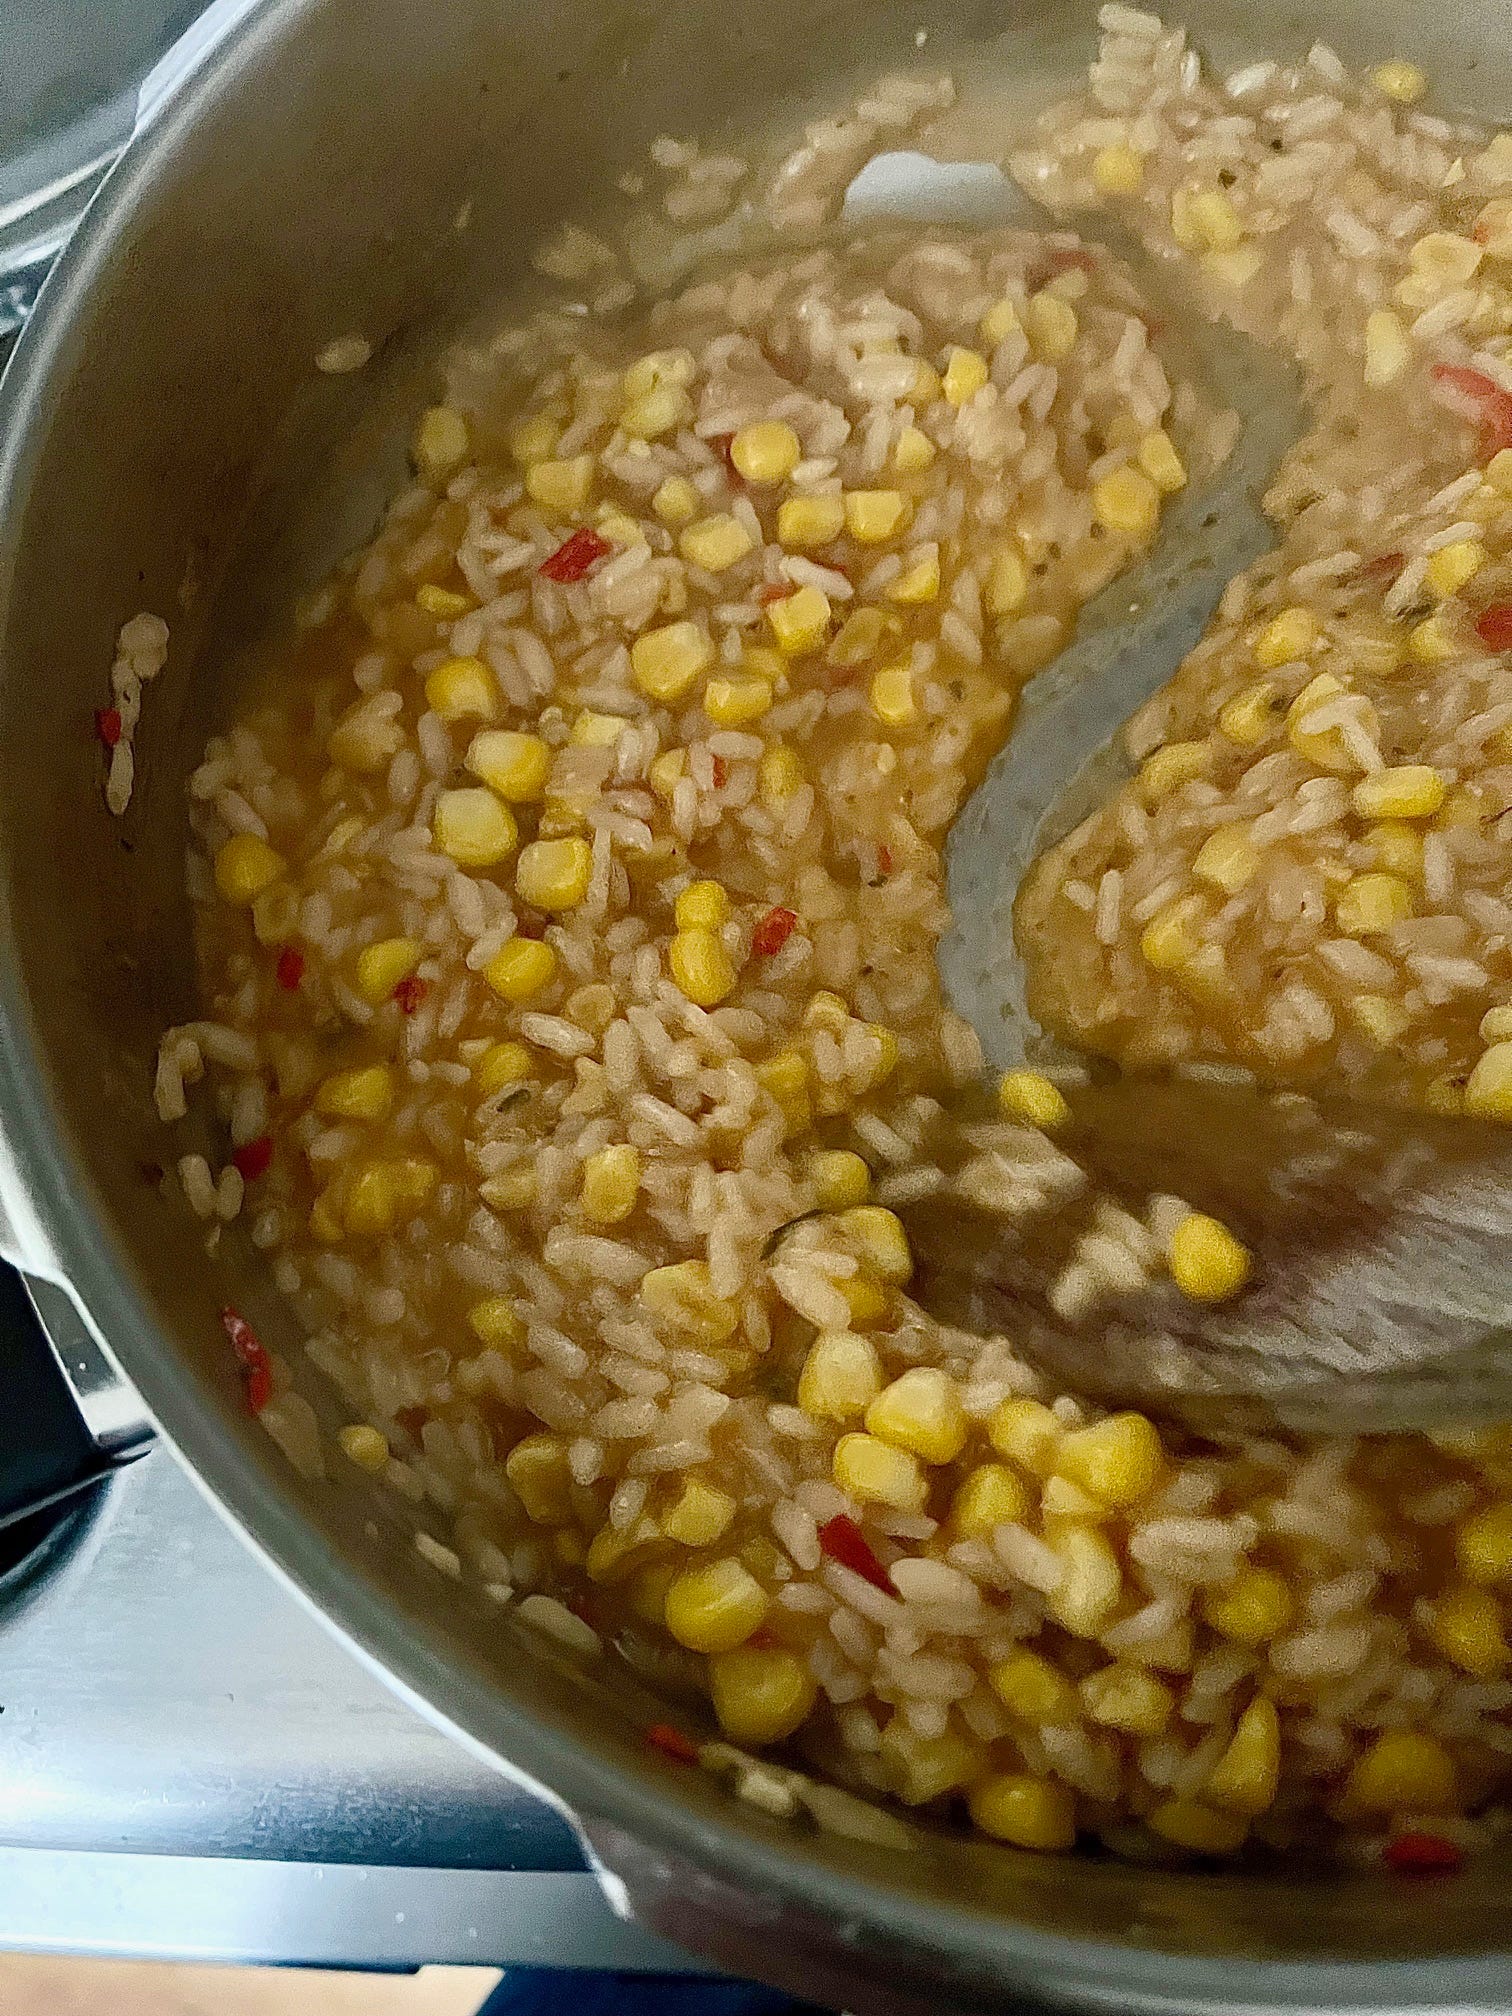
I kept this risotto deliberately simple as I wanted a showcase for the corn. But not being able to leave well alone, at the last minute I tossed some North Atlantic prawns in a hot garlic butter enriched with Tajin and a little extra lime juice and zest and it was very good. For another take on sweetcorn risotto, I’d like also to point you in the direction of this sweetcorn risotto, by Ravinder Bhogul who is an absolute genius at flavour. You can make the risotto in exactly the same way as I do here.
Cooked kernels from 2 corn on the cobs (or frozen equivalent) - around 300g
1 tbsp olive oil
35g butter
1 onion, finely chopped
1 red chilli, finely chopped
2 cloves garlic, finely chopped
Leaves from a sprig of thyme
300g risotto rice
1/2 tsp smoked paprika
100ml white wine or vermouth
750ml chicken, vegetable or corn stock
30g parmesan or equivalent, finely grated
First take around a third of the corn and puree it to a cream. This will give an extra creamy sweetness to your risotto.
Heat your pressure cooker and add the olive oil and half the butter. When the butter has melted and foamed, add the onion and unpureed corn kernels. Saute for a couple of minutes, just to get them started, then add the chilli, garlic, thyme and rice. Stir so the rice is glossy with the butter, then stir in the paprika and the creamed sweetcorn.
Pour in the vermouth or wine and allow to reduce to nothing. Then add all of the stock and season with salt and pepper. Make sure the base is deglazed, then close the lid and bring up to high pressure. Reduce the heat so it is just high enough to maintain the pressure and cook for 5 minutes for arborio, 6 minutes for carnaroli.
Carefully fast release the pressure (steadily is key or in short bursts - you don’t want starch coming out of the vents), then beat in the remaining butter and most of the parmesan.
Serve as is, with more black pepper and parmesan, or with any garnishes you fancy.
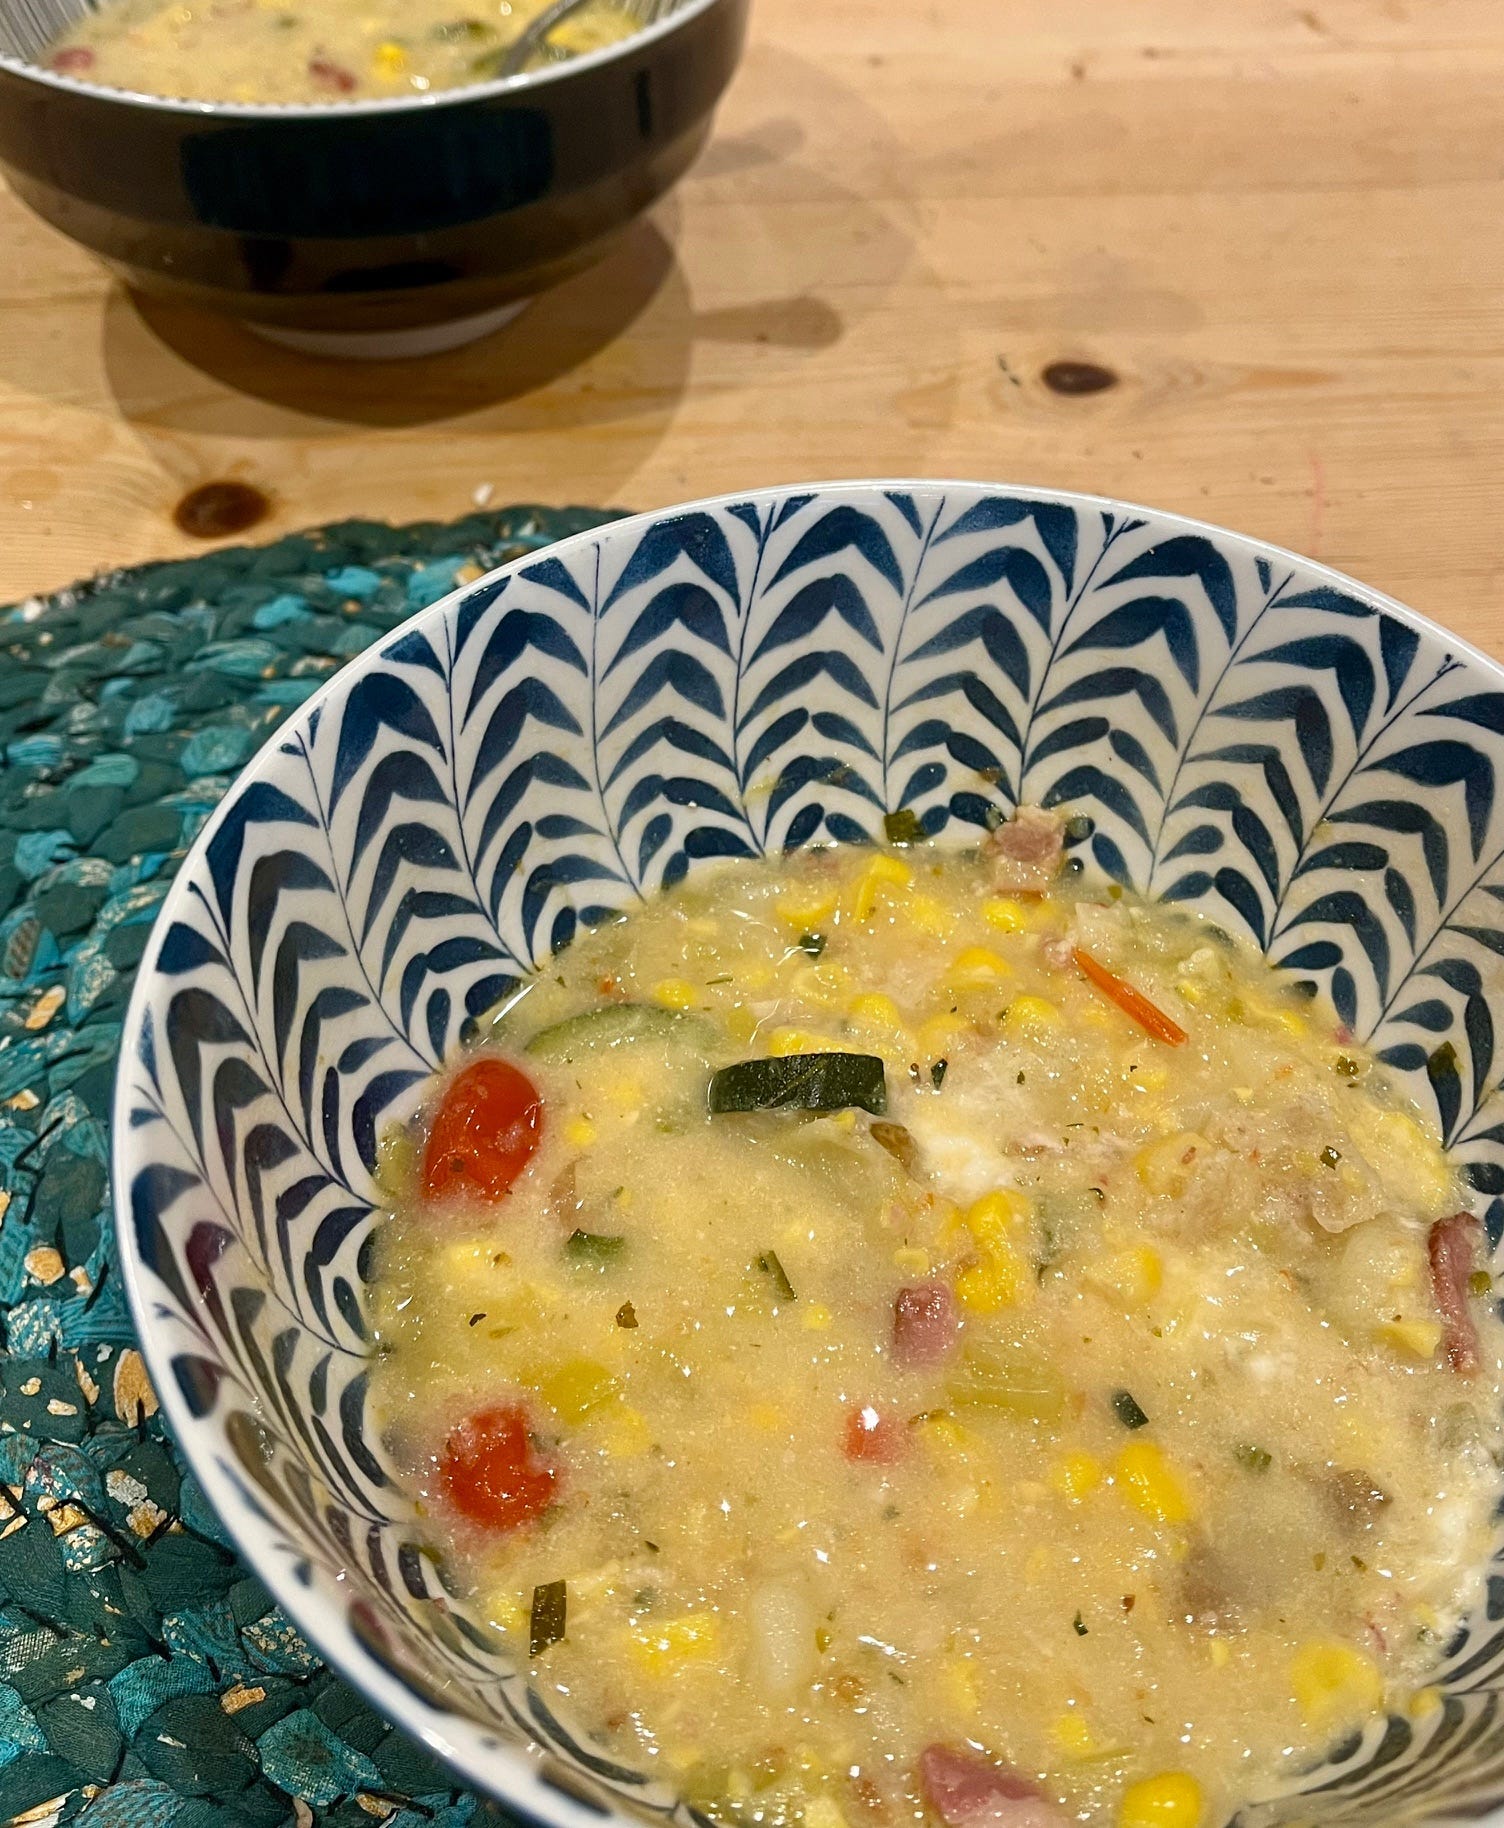
Sweetcorn Chowder
Remember my baked potato soup earlier in the year? Well, this soup is also much better if you use baked potatoes. Which is why I specify cooked potatoes in the recipe. But if you wanted to be traditional with your chowder and use diced raw potatoes instead, you can do, just increase the cooking time by a couple of minutes. It won’t hurt any of the other ingredients. You can also replace the potatoes partially or in their entirety by other ingredients - try celeriac, using the same cooking times or cauliflower, reducing the stand time before releasing pressure to 1 minute.
Tomatoes - not traditionally part of a creamy chowder, but I like the sweet, acidic pop they add to it, especially during the summer months.
1 tbsp olive oil (optional)
50g bacon (optional)
15g butter
1 small onion, finely chopped
2 leeks, finely sliced
1 slender courgette, finely sliced
2 garlic cloves, finely chopped
Leaves from a large sprig of tarragon, finely chopped
cooked kernels from 2 cobs (around 300g) OR frozen equivalent
400g cooked potatoes, preferably unpeeled, roughly chopped
A splash of wine or vermouth - around 50ml at most
A splash of white wine or vermouth
600ml stock (corn or chicken or vegetable)
100g cherry tomatoes, left whole
A sprig of basil
100ml buttermilk or 50ml creme fraiche or cream cheese
If you are making the bacon garnish, heat the olive oil in your pressure cooker and add the bacon. Fry until crisp. You don’t have to do this in the pressure cooker but better for the flavour to go in the soup rather than stay in the base of the frying pan (unless you want to use it for frying an egg or similar, obviously). Remove the bacon from the cooker and set aside.
Melt the butter in the cooker and add the onion, leeks, courgette, garlic and tarragon. Stir until glossy, then add the corn and potatoes. Pour in the wine or vermouth and bring to the boil. Add the stock, then season with salt and pepper. Give a gentle stir to make sure the base is deglazed, then drop in the cherry tomatoes and the sprig of basil. Bring up to high pressure, cook for 1 minute, then leave to drop pressure for 5 minutes. Release any remaining pressure, then fish out the basil. Stir in the buttermilk or creme fraiche. Give a very quick blitz - I push all the tomatoes to one side so they stay intact and cream just half of the soup - and serve, topped with the bacon if using.
I like adding soft cheeses to this - goat’s curd is ideal, drizzled with a little oil or cut through with herbs and/or chilli.
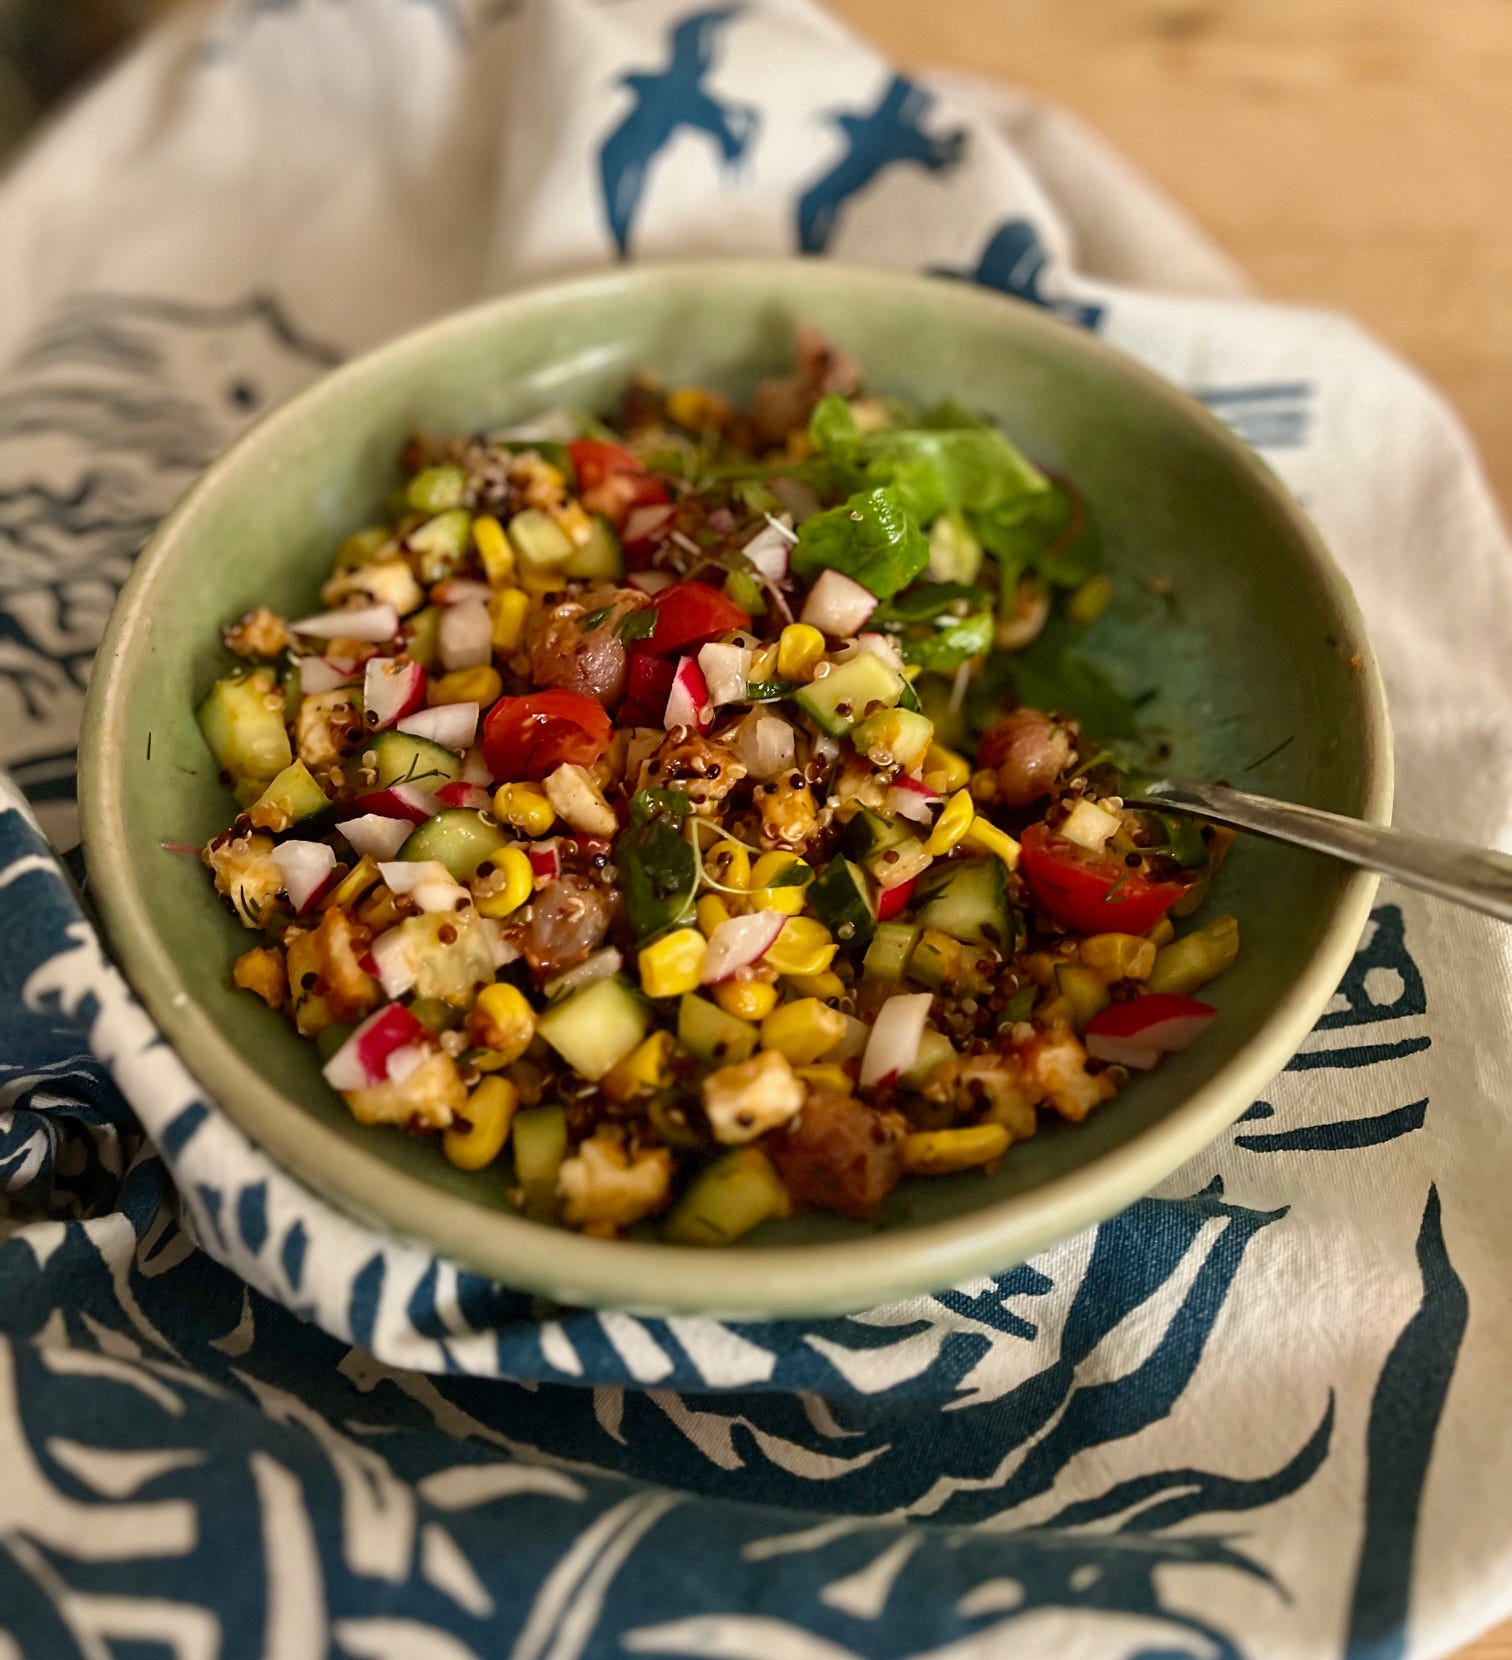
Sweetcorn, Quinoa and Halloumi Salad
I have made a lot of salads with corn in the last few weeks. My son will tell you that his favourite is a potato one with bacon and a buttermilk dressing. I pair sweetcorn with all types of beans (black beans or butterbeans best of all), it works with chicken, see above for how to cook chicken and corn together. This one is a classic chopped salad, with everything chopped fairly similarly and mixed together - no two mouthfuls tasting quite the same.
For the salad:
2 tbsp olive oil
50g quinoa, well rinsed
1/2 tsp dried mint
1/2 tsp dried oregano
150g white or red grapes
2 corn on the cobs
1 block halloumi, sliced
1/2 cucumber, diced
2 celery sticks, diced
50g radishes, diced
200g cherry tomatoes, chopped
Herbs - I used dill, basil, thyme, parsley, use whatever you have/like
4 large handfuls of salad leaves/micro greens
For the dressing:
25g sun blush tomatoes (smoked if possible)
3 tbsp olive oil (from the tomato jar if you have enough)
1 small garlic clove, grated or crushed
1 tbsp sherry vinegar
juice and zest of 1/2 lime
1/2 tsp smoked sweet or hot paprika
First, cook the quinoa, grapes and corn. Heat your pressure cooker and add the 1 tbsp of the oil. When it is hot, add the quinoa and toast until it starts to give off a strong, pleasantly nutty aroma. Stir in the dried herbs and season with salt and pepper. Pour in 100ml water and drop in the grapes. Add a trivet and steamer basket and add the corn. Bring up to high pressure and cook for 1 minute. Leave to drop pressure naturally.
Remove the corn from the cooker. When it is cold enough to handle, cut the kernels away from it. Leave the quinoa, grapes and corn to cool.
Cook the halloumi. Heat the oil in a pan, add the halloumi and fry on both sides until soft and lightly browned. Remove from the pan and dice. Set aside.
Make the salad dressing. Put everything in a small food processor and blitz together. Add a little water if very thick.
To assemble, put all the cooked ingredients into a bowl with the cucumber, celery, spring onions, tomatoes and radishes. Stir in most of the dressing, then fold in the herbs. Arrange the leaves over four bowls and top with the dressed ingredients. Sprinkle over plenty of herbs.
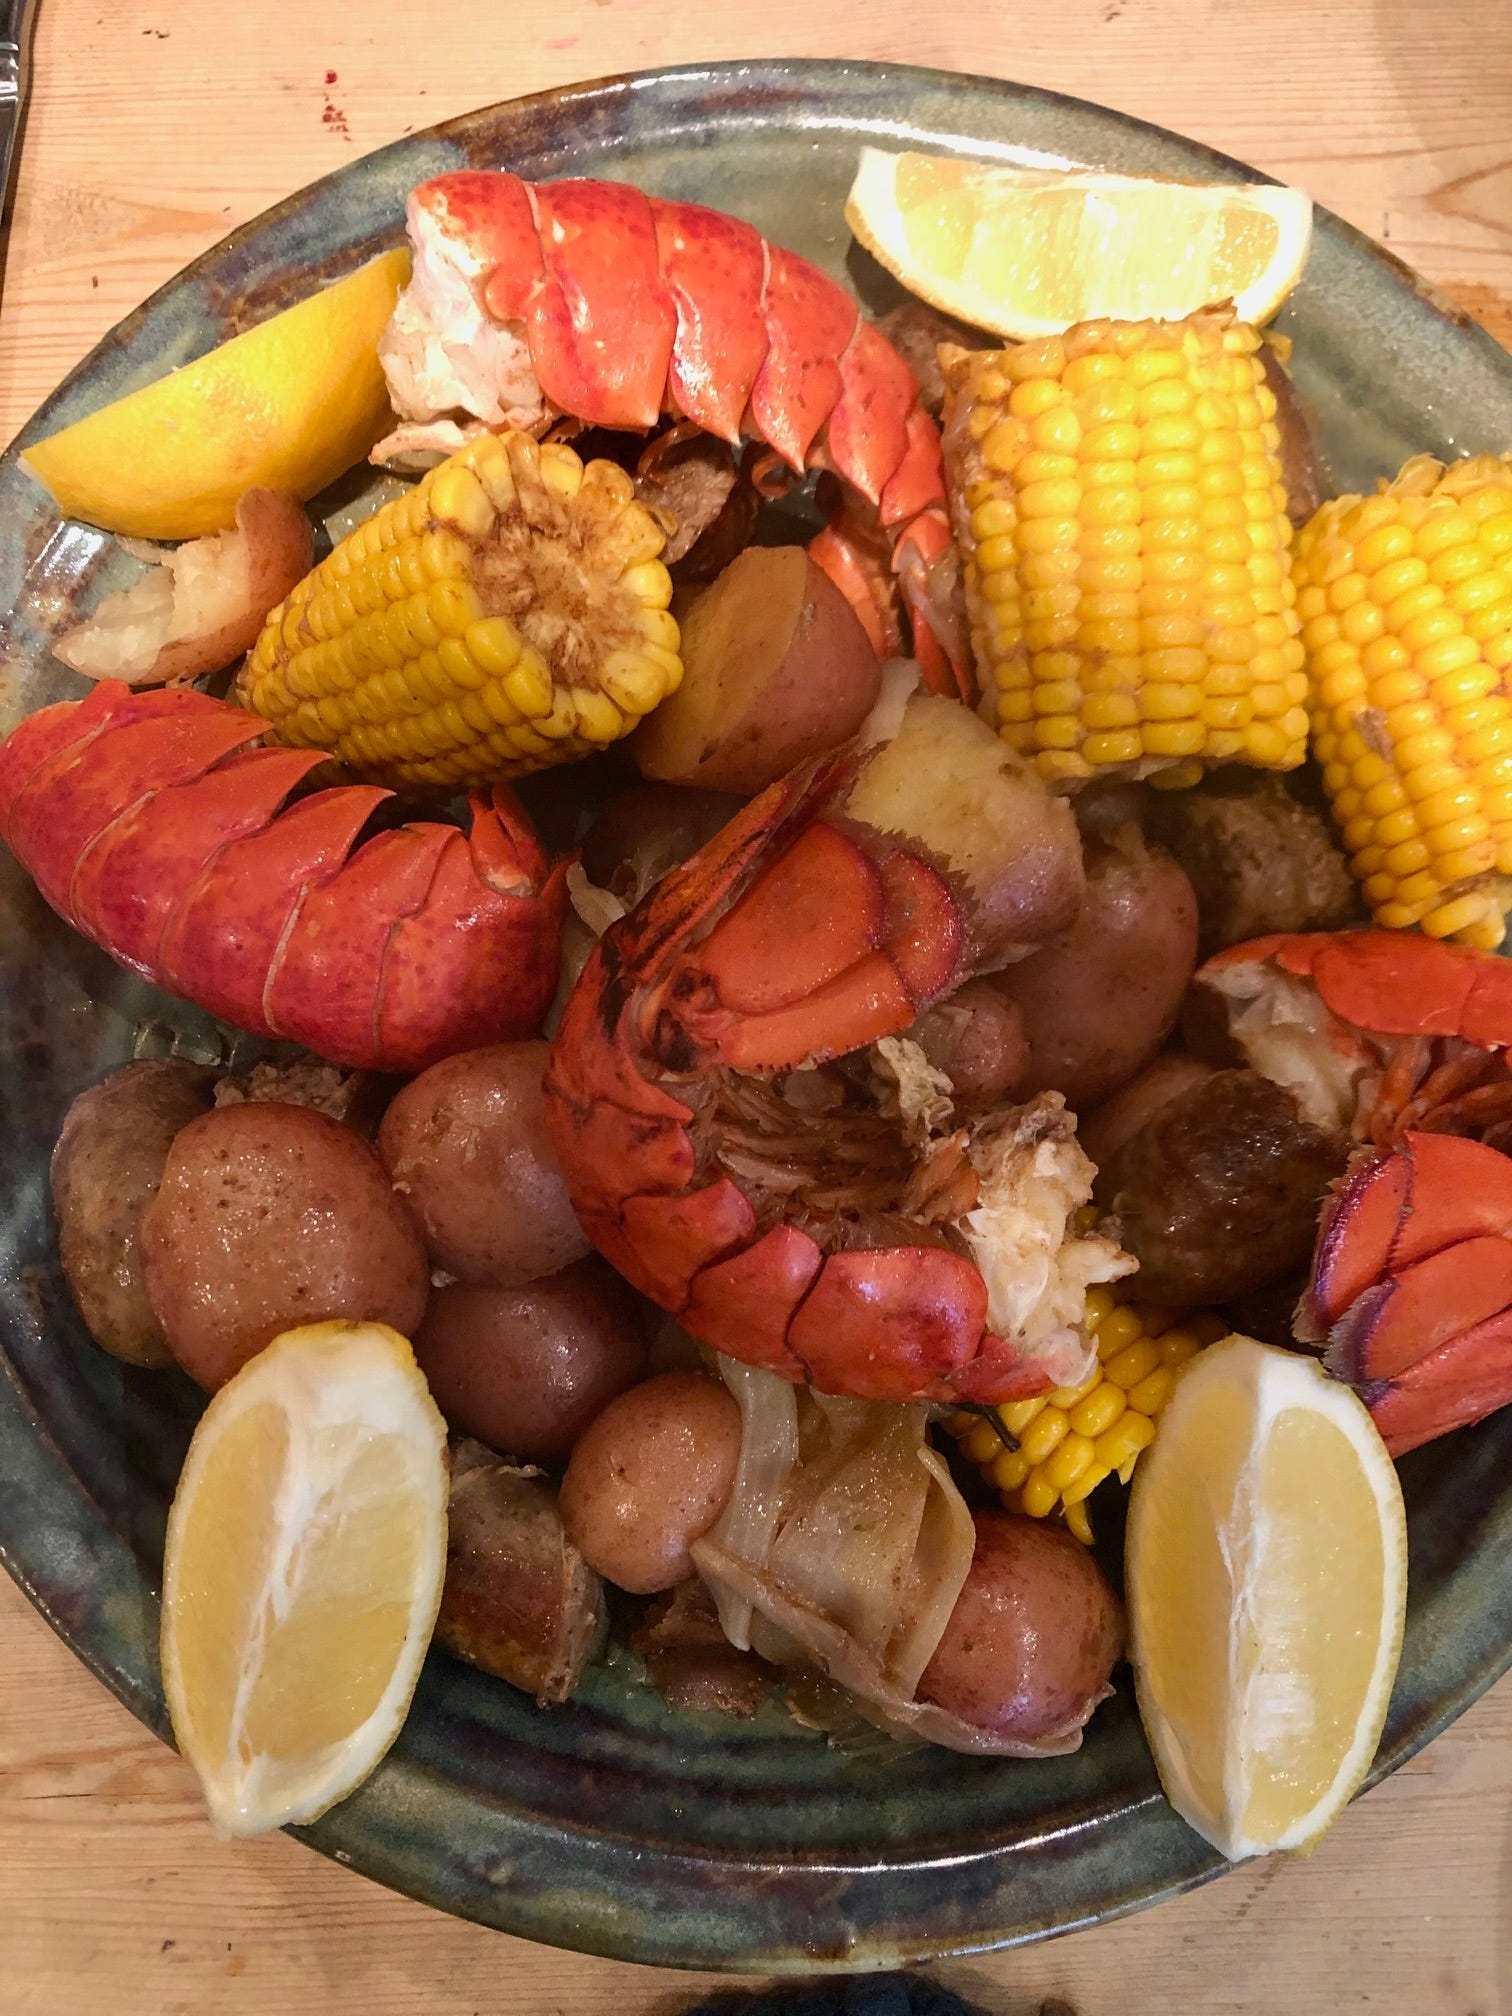
And finally, something fun the sort of thing I’d do on the holiday. It’s a seafood boil, which takes a few minutes and hardly any water instead of being the huge operation it normally is. No recipe because it is in Modern Pressure Cooking. Here’s one I did many moons ago, using lobster tails:
Thank you for reading! This is a free post, so please share with anyone you think might enjoy it. And please do consider clicking on the heart - it only takes a moment!
And another reminder that Everyday Pressure Cooking is available to preorder here.

Thoroughly enjoyed this. Like you am very fond of fresh and frozen sweetcorn. Handy tip re the chopping - thanks!
A really yummy set of recipes, and excellent way to cook corn on the cob.